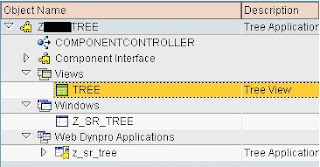
1. Create a Webdynpro component with one view
2. Create a Node FLIGHT with cardinality 1:1. Create sub node CARRID_NODE within FLIGHT, sub node CONNID_NODE within CARRID_NODE and sub node PLANETYPE_NODE within CONNID_NODE. All the sub nodes should be non singleton and should have cardinality 0:n. Create attribute CARRID type SFLIGHT-CARRID, CONNID type SFLIGHT-CONNID and PLANETYPE type SFLIGHT-PLANETYPE within CARRID_NODE, CONNID_NODE and PLANETYPE_NODE respectively.

3. Create a Tree UI element in the layout of View. Create two Tree Node Types CARRID and CONNID. And create a Tree Node Item PLANETYPE.
4. Bind the property DATA SOURCE of Tree UI element with FLIGHT Node.
5. Bind CARRID_NODE node to property DATA SOURCE of CARRID Tree Node Type. And bind CARRID attribute within CARRID_NODE to property TEXT.
6. Similarly bind CONNID_NODE node to property DATA SOURCE of CONNID Tree Node Type. And bind CONNID attribute within CONNID_NODE to property TEXT. And PLANETYPE_NODE node to property DATA SOURCE of PLANETYPE Tree Node Item. And bind PLANETYPE attribute within PLANETYPE _NODE to property TEXT.
7. Create supply functions FILL_CARRID, FILL_CONNID and FILL_PLANETYPE for the nodes CARRID_NODE, CONNID_NODE and PLANETYPE_NODE respectively.
8. In the FILL_CARRID method write the following code,
types : begin of ty_carrid,
carrid type sflight-carrid,
end of ty_carrid.
data : lt_carrid type table of ty_carrid.
select distinct carrid
into table lt_carrid
from sflight.
node->bind_table( lt_carrid ).
Select all the distinct CARRID values from SFLIGHT and pass it to the NODE.
9. In the FILL_CONNID method write the following code
types : begin of ty_connid,
connid type sflight-connid,
end of ty_connid.
data : lt_connid type table of ty_connid,
lv_carrid type sflight-carrid.
parent_element->get_attribute(
exporting
NAME = 'CARRID'
importing
VALUE = lv_carrid ).
select distinct connid
into table lt_connid
from sflight
where carrid = lv_carrid.
node->bind_table( lt_connid ).
Get the selected CARRID by the user, for that get all distinct CONNID
from SFLIGHT and pass it to the node.
10. In the FILL_PLANETYPE method write the following code
Types : types : begin of ty_planetype,
planetype type sflight-planetype,
end of ty_planetype.
data : lt_planetype type table of ty_planetype,
lv_connid type sflight-connid.
parent_element->get_attribute(
exporting
NAME = 'CONNID'
importing
VALUE = lv_connid ).
select distinct planetype
into table lt_planetype
from sflight
where connid = lv_connid.
node->bind_table( lt_planetype ).
Get the selected CONNID by the user, for that get all distinct PLANETYPE
from SFLIGHT and pass it to the node.
11. Add the view to the window, create an Application and activate the
entire component. Now Test the application.
12. The output you get will be like this. Under the root node Flights, first level will be all distinct Carrier ids. Under carrier id you will have distinct Connection id for that Carrier id. And under Connection id you will have distinct Plane types for that Connection id.


No comments:
Post a Comment